So it has been a while since I did an update on my terrain projects. Work on my swamp terrain stopped when I got sick and I really want to get some trees done more to my satisfaction. Also some river terrain pieces have been started as you can see in the following video:
Showing posts with label Terrain. Show all posts
Showing posts with label Terrain. Show all posts
Thursday, August 13, 2009


Tuesday, August 4, 2009
Terrain: Play mats & craft store bought terrain
It is surprising to a lot of people how many good terrain pieces can simply be bought ready to go for cheap from a craft or hobby store. If you've got a small budget this is the way to go!
Fabric stores often have on discount weird or exotic fabric types that work great as play mats for wargaming terrain tables. Most won't even need any changes done to them. Honestly when you see playmats from "terrain stores" they're often buying the exact same fabric store mats and marking their retail price up by as much as 4 times! When if you go into the fabric store you'll usually find them on discount. The ones I've picked up I generally picked up at 60-75% off discounts which is a HUGE savings. Not to mention I like seeing stuff in person and having the instant gratification of walking out the door with it.
Not enough players who want some decent tabletop terrain consider hobby and craft store pieces. Your friendly local game store probably doesn't carry model train supplies, but hobby stores often do and many of the items you can find are perfect. Bachmann trains for instance has a lot of trees and vegetation making material which is perfect for any scale of gameplay. See in this video where they are being based and put to use by Terranscapes:
Your local craft store might require more work to find something in the correct scale for 28mm wargaming, but you should be able to find it or modify it without too much difficulty. The extra nice part is that the terrain pieces sold at a craft store tend to be on the very cheap end. Woodland scenics sells a lot of very nice terrain making materials mostly intended for use in school projects or modeling. I've bought some of their trees before and they work very nicely as cheap tabletop terrain throw-downs. You can go a lot further in making elaborate designs with some of their other materials and best yet for those of you new to making your own terrain is that they have a lot of instructional materials as well. Another one in the "love-it but won't admit it" category is Lemax collectables. A lot of these aren't in the correct scale for 28mm gaming, but a fair amount of them are. Gravestones, vineyards, and crypts can be found in the correct scale and they go a long ways towards making a very realistic setting. Plus when can't it be fun to detonate a traditional halloween or christmas display in a fantastic battle of miniatures wargaming?
Fabric stores often have on discount weird or exotic fabric types that work great as play mats for wargaming terrain tables. Most won't even need any changes done to them. Honestly when you see playmats from "terrain stores" they're often buying the exact same fabric store mats and marking their retail price up by as much as 4 times! When if you go into the fabric store you'll usually find them on discount. The ones I've picked up I generally picked up at 60-75% off discounts which is a HUGE savings. Not to mention I like seeing stuff in person and having the instant gratification of walking out the door with it.
Not enough players who want some decent tabletop terrain consider hobby and craft store pieces. Your friendly local game store probably doesn't carry model train supplies, but hobby stores often do and many of the items you can find are perfect. Bachmann trains for instance has a lot of trees and vegetation making material which is perfect for any scale of gameplay. See in this video where they are being based and put to use by Terranscapes:
Your local craft store might require more work to find something in the correct scale for 28mm wargaming, but you should be able to find it or modify it without too much difficulty. The extra nice part is that the terrain pieces sold at a craft store tend to be on the very cheap end. Woodland scenics sells a lot of very nice terrain making materials mostly intended for use in school projects or modeling. I've bought some of their trees before and they work very nicely as cheap tabletop terrain throw-downs. You can go a lot further in making elaborate designs with some of their other materials and best yet for those of you new to making your own terrain is that they have a lot of instructional materials as well. Another one in the "love-it but won't admit it" category is Lemax collectables. A lot of these aren't in the correct scale for 28mm gaming, but a fair amount of them are. Gravestones, vineyards, and crypts can be found in the correct scale and they go a long ways towards making a very realistic setting. Plus when can't it be fun to detonate a traditional halloween or christmas display in a fantastic battle of miniatures wargaming?
Saturday, August 1, 2009
Terrain: My projects
So I thought it time to show you some of my own projects that I'm working on. You can see a thatched roof and a project just started where I'm using a wood base to plan a new project in this video:
You can see the progress on the roof thatching and how well the paper mache worked in the followup.
This blog entry was supposed to have a lot more info in it. It got cut short however by a glass explosion in the kitchen where my wife detonated my favorite cobbler dish. More entries on terrain should be coming soon and I should have some videos showing off making realistic water with envirotex at some point.
You can see the progress on the roof thatching and how well the paper mache worked in the followup.
This blog entry was supposed to have a lot more info in it. It got cut short however by a glass explosion in the kitchen where my wife detonated my favorite cobbler dish. More entries on terrain should be coming soon and I should have some videos showing off making realistic water with envirotex at some point.
Wednesday, July 29, 2009
It sure is hot
One of the things I looked forward to when moving back to Seattle was the more moderate climate. Doesn't feel like it right now though I know things are a lot worse in the interior of the state.
Speaking of heat, I wonder if anyone at EA is ever going to feel it?
 EA and their Dante's Inferno publicity stunds are a Penny Arcade punchline now. I'm almost eager for them not to repent, they're a sponsor of PAX and if they pull this kind of stunt there they'll be invoking unholy retribution. The kind that would just put a smile on my face.
I've been working a lot on terrain lately and I intend to do a terrain segment showing off what I've built and how I've done it. Here is a prelude of what is to come.
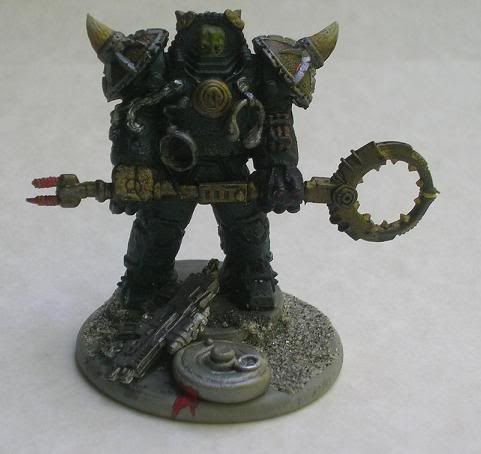 Speaking of excitement, all you VOR fans are going to start getting excited next week I'm informed. I'm sworn to secrecy but I think monday will be a good day to be camping the bioplazm forums. Meanwhile I've been working on my Golem, trying to figure out what detail colors I'm going to be using for my Pounders.
Speaking of heat, I wonder if anyone at EA is ever going to feel it?
EA and their Dante's Inferno publicity stunds are a Penny Arcade punchline now. I'm almost eager for them not to repent, they're a sponsor of PAX and if they pull this kind of stunt there they'll be invoking unholy retribution. The kind that would just put a smile on my face.I've been working a lot on terrain lately and I intend to do a terrain segment showing off what I've built and how I've done it. Here is a prelude of what is to come.
Speaking of excitement, all you VOR fans are going to start getting excited next week I'm informed. I'm sworn to secrecy but I think monday will be a good day to be camping the bioplazm forums. Meanwhile I've been working on my Golem, trying to figure out what detail colors I'm going to be using for my Pounders.
Monday, July 27, 2009
Terrain: Plaster - Hirst Arts

 So when it comes to making terrain to play with out of plaster, Hirst Arts is the first and last website you should go to. Bruce Hirst is the primary artist selling plaster molds for terrain making, most places selling plaster molds or plaster terrain are doing what they can to copy from him. Go direct to his videos page and you can see exactly how it is done along with some other extra helpful stuff. His videos cover how to use plaster molds, how to use resin in them, how to paint, painting lava, and best of all how to make water features.
The basics are you buy a mold, poor wet plaster into it and let dry, then you have super detailed building blocks for making a sturdy building of whatever you like.
 In addition to the buildings you can make with blocks from his mold (My buildings are pictured to the right), he also has a wealth of information on how to do other terrain effects and general hobby advice. Whether you are looking for sculpting techniques,
creative tabletop monsters, creating realistic water fountains,
making colored windows, dead trees, tips for painting futuristic models and a lot of other tips and tricks then Bruce Hirst's site is the one to visit. I have to give an extra special notice though to his river sections, they're just amazing and create the most realistic water you could ever want to play on.
For the Anima Tactics players I have to recommend all the Gothic molds Hirst has for evoking the setting really well. Shard or other sci-fi game players could do really well with the Schematic Mold which I have my building pictures of above and to the right. Though I'm eager to see a Neo-Soviet player make good use of the Pipe Molds and create an impressive Soviet chemical factory.
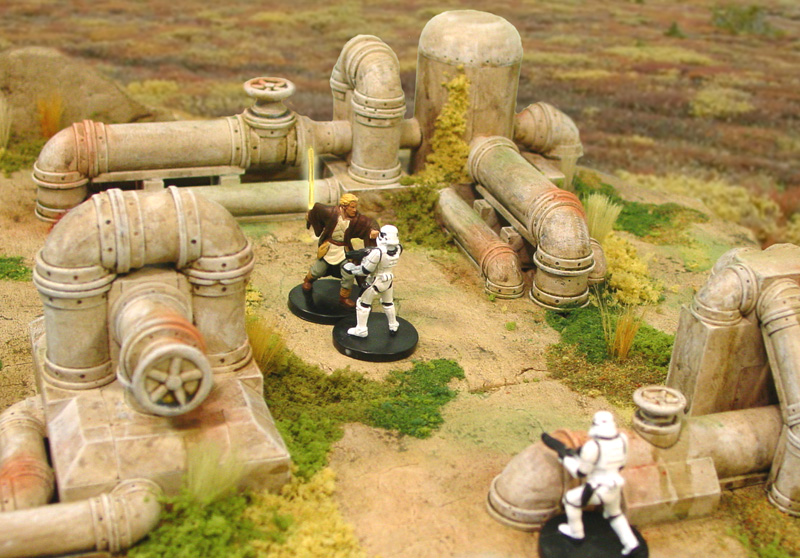
Have I convinced you to have a look at his website yet?
This just about concludes the series I had intended on tabltop terrain. If you got anything else I should add, a different series idea, or whatever please leave a comment.
Wednesday, July 22, 2009
Terrain: Sculpting materials
In general it is a bad idea to make an entire terrain project out of these materials, but they can really help you get exactly what you want. The obvious idea is that you use them to make your terrain project look the exact way you want. The reason not to use them for the entire project is that they're rarely sturdy enough nor economical enough.
Sculpting materials that I've seen used a lot are:
I won't include foam for the same reasons I won't include wood or metal. People who use blue or pink foam a lot insist it is a sculpting material. It isn't. You can sculpt them by taking parts of the substance away, not by shifting its mass into a different shape. Besides I've already covered them in an earlier blog post.
Green stuff and Brown stuff are both forms of Kneadatite sculpting materials usually used by miniatures modelers. Some people because they're familiar with it use it on a large scale for terrain projects as well. This stuff is expensive though, don't waste it like that! Also, these materials are designed for being very finely sculptable... not for supporting heavy weights. Your finely sculpted terrain project may deform when heavy weight is placed upon it. But if you want to do something small with a lot of detail, like sculpt a miniature flower for the terrain scene you could use this just like you would with sculpting miniatures.
Brown stuff is very similar to green stuff with slightly different properties. Advanced sculptors use it in conjunction with green stuff when sculpting models. Most importantly all forms of Kneadatite are mildly toxic! Always wash your hands before touching your eyes, eating, or handling babies.
Clays and polymer clays. The big difference is that clays harden by drying out and polymer clays are designed to harden by baking. How much time do you need to complete your sculpting project? While these are used a fair amount, I recommend only using them on a limited basis because when they harden they also shrink and deform small amounts. On the plus side they can be fairly cheap (especially compared to green stuff!) and are very sturdy for storing or playing on.
Easily my favorite and most recommended is paper mache or Papier Mache for my french speaking wife. Basically made from paper and glue. It is cheap, sturdy, and doesn't deform while it hardens. The trick is not letting it deform while it is still wet! But you can add a lot of things to paper mache to make it harder initially. The same things you add to your mache can also be used to change the texture. Right now I've been experimenting with adding different kinds of sand to the mix because they give a different texture. Once dry it takes paint readily, after all it is made from paper and glue right?
Here is an example of how you can use it and the size of projects that can be made from it:
Sculpting materials that I've seen used a lot are:
I won't include foam for the same reasons I won't include wood or metal. People who use blue or pink foam a lot insist it is a sculpting material. It isn't. You can sculpt them by taking parts of the substance away, not by shifting its mass into a different shape. Besides I've already covered them in an earlier blog post.
Green stuff and Brown stuff are both forms of Kneadatite sculpting materials usually used by miniatures modelers. Some people because they're familiar with it use it on a large scale for terrain projects as well. This stuff is expensive though, don't waste it like that! Also, these materials are designed for being very finely sculptable... not for supporting heavy weights. Your finely sculpted terrain project may deform when heavy weight is placed upon it. But if you want to do something small with a lot of detail, like sculpt a miniature flower for the terrain scene you could use this just like you would with sculpting miniatures.
Brown stuff is very similar to green stuff with slightly different properties. Advanced sculptors use it in conjunction with green stuff when sculpting models. Most importantly all forms of Kneadatite are mildly toxic! Always wash your hands before touching your eyes, eating, or handling babies.
Clays and polymer clays. The big difference is that clays harden by drying out and polymer clays are designed to harden by baking. How much time do you need to complete your sculpting project? While these are used a fair amount, I recommend only using them on a limited basis because when they harden they also shrink and deform small amounts. On the plus side they can be fairly cheap (especially compared to green stuff!) and are very sturdy for storing or playing on.
Easily my favorite and most recommended is paper mache or Papier Mache for my french speaking wife. Basically made from paper and glue. It is cheap, sturdy, and doesn't deform while it hardens. The trick is not letting it deform while it is still wet! But you can add a lot of things to paper mache to make it harder initially. The same things you add to your mache can also be used to change the texture. Right now I've been experimenting with adding different kinds of sand to the mix because they give a different texture. Once dry it takes paint readily, after all it is made from paper and glue right?
Here is an example of how you can use it and the size of projects that can be made from it:
Friday, July 17, 2009
Terrain Projects: basing
The most important skill for making terrain is having a good eye for finding stuff to use. But the most important part of your actual terran making is selecting a good base. The base is very important to the playability, but most importantly it is the main determiner of durability.
Without a good foundation the terrain project is not going to be durable for play, storage, and transport. On Metal or Resin terrain pieces you might get away with not having a base, but for everything else it is just about essential.
Here is a video which shows off some wood based terrain and the natural rocks and things it can support. In general (but not always, varies on type) wood is sturdy at thinner proportions than foam and gives support to heavier structures but it isn't as sculptable.
All good bases I've worked from have either been metal, wood, or foam. Avoid the temptation to use plasticard or cardboard. They're sturdy but they also warp too easily. Good metal bases are hard to come by unless you have friends in a metal shop as they can often get you scrap material that is perfect for it. If you're not a professional metalworker, stay away from making your own!
That leaves Wood and various types of foam. There are a lot of ups and downs to both and even more when the varieties of wood and foam are taken into account. My preference is for wood because I have more of the tools to work with wood and I like to avoid the toxic gasses that are produced when heating foam. This is really a preference thing and the majority of tabletop I know of is made from foam.
This plus some good air circulation is what you need for scupting foam properly:
Let me stress it again, don't work with heated foam in a closed off room. It isn't good for you or anyone else who has to breath vaporized foam.
Aside: Here is the second part in case you want the link
If you don't have the tools and the materials already for more advanced foam or wood work then you're mostly going to be buying flats. You can go to a home supply store (i.e. Home Depot) and buy large boards of foamboard (foam with plastic on the sides) or your local craft store (i.e. Michael's) is likely to have a good selection of wood flats (mostly Balsa wood, but also some others). A good hobby knife or box cutter is usually enough for these to get the correctly proportioned base you want and need.
As a general rule of thumb when putting things on your base start with the largest things first. Doesn't matter if you're building ruins, basing figures, or wilderness scenes. Full buildings and fortresses, then trees and boulders, then smaller plants and rubble, etc. It is easiest to work form largest detail to smallest.
P.S. Here is a series of 5 youtube videos on making a set of foam hills by Blue Table Painting.
Without a good foundation the terrain project is not going to be durable for play, storage, and transport. On Metal or Resin terrain pieces you might get away with not having a base, but for everything else it is just about essential.
Here is a video which shows off some wood based terrain and the natural rocks and things it can support. In general (but not always, varies on type) wood is sturdy at thinner proportions than foam and gives support to heavier structures but it isn't as sculptable.
All good bases I've worked from have either been metal, wood, or foam. Avoid the temptation to use plasticard or cardboard. They're sturdy but they also warp too easily. Good metal bases are hard to come by unless you have friends in a metal shop as they can often get you scrap material that is perfect for it. If you're not a professional metalworker, stay away from making your own!
That leaves Wood and various types of foam. There are a lot of ups and downs to both and even more when the varieties of wood and foam are taken into account. My preference is for wood because I have more of the tools to work with wood and I like to avoid the toxic gasses that are produced when heating foam. This is really a preference thing and the majority of tabletop I know of is made from foam.
This plus some good air circulation is what you need for scupting foam properly:
Let me stress it again, don't work with heated foam in a closed off room. It isn't good for you or anyone else who has to breath vaporized foam.
Aside: Here is the second part in case you want the link
If you don't have the tools and the materials already for more advanced foam or wood work then you're mostly going to be buying flats. You can go to a home supply store (i.e. Home Depot) and buy large boards of foamboard (foam with plastic on the sides) or your local craft store (i.e. Michael's) is likely to have a good selection of wood flats (mostly Balsa wood, but also some others). A good hobby knife or box cutter is usually enough for these to get the correctly proportioned base you want and need.
As a general rule of thumb when putting things on your base start with the largest things first. Doesn't matter if you're building ruins, basing figures, or wilderness scenes. Full buildings and fortresses, then trees and boulders, then smaller plants and rubble, etc. It is easiest to work form largest detail to smallest.
P.S. Here is a series of 5 youtube videos on making a set of foam hills by Blue Table Painting.
Tuesday, July 14, 2009
Quality Terrain from Random Stuff
If you're going to build your own terrain then the first skill I recommend developing is a good eye. There are lots of things all around you that can be used to make great terrain projects. If you look in my boxes of standard terrain making materials you'll find a lot of things that I just picked up.
Sticks of the right proportion can be used to make great trees or tree stumps. Tiny gravel scales to become large rocks and small rocks can be used as boulders. Got Cotton? String it out and use it as fog on your battlefield. Collect some lichens and use them as alien plants. Terrainaholic on youtube has a lot of videos where he just uses stuff he has laying around or finds on car trips.
Why do those pieces of bark work so well as rocks? Shape and texture, that is what you're really looking for. If you're in the miniature wargaming hobby then you shouldn't be afraid of painting things and a lot of stuff that doesn't work initially works well after you put a coat of paint on it. Sometimes the gravel rocks you find might not be the right color for frozen tundra glacier rocks... so why not paint them? It might seem odd to paint rocks the color you want, but it can work really really well.
One of my favorite tricks that I use for basing figures and making terrain is gathering my own Talus. People can pay $10 for a little plastic store container of talus material that isn't as good as what you can find in your concrete driveway or parking lot. Where the concrete pavement has cracked you'll find small bits of sandy and rocky material that can be sorted for all kinds of diferent sizes of Talus. Water Glue it on, and if you don't like the color paint over it.
Sometimes a little bit of cutting or assembly will get something of the right size and texture to a good piece of terrain. Here is another video from Youtube channel "Wargamepainting" that makes excellent "dead trees".
Work on it and share with everyone what you've found that is easily available and works to make great terrain or figure conversions.
Sticks of the right proportion can be used to make great trees or tree stumps. Tiny gravel scales to become large rocks and small rocks can be used as boulders. Got Cotton? String it out and use it as fog on your battlefield. Collect some lichens and use them as alien plants. Terrainaholic on youtube has a lot of videos where he just uses stuff he has laying around or finds on car trips.
Why do those pieces of bark work so well as rocks? Shape and texture, that is what you're really looking for. If you're in the miniature wargaming hobby then you shouldn't be afraid of painting things and a lot of stuff that doesn't work initially works well after you put a coat of paint on it. Sometimes the gravel rocks you find might not be the right color for frozen tundra glacier rocks... so why not paint them? It might seem odd to paint rocks the color you want, but it can work really really well.
One of my favorite tricks that I use for basing figures and making terrain is gathering my own Talus. People can pay $10 for a little plastic store container of talus material that isn't as good as what you can find in your concrete driveway or parking lot. Where the concrete pavement has cracked you'll find small bits of sandy and rocky material that can be sorted for all kinds of diferent sizes of Talus. Water Glue it on, and if you don't like the color paint over it.
Sometimes a little bit of cutting or assembly will get something of the right size and texture to a good piece of terrain. Here is another video from Youtube channel "Wargamepainting" that makes excellent "dead trees".
Work on it and share with everyone what you've found that is easily available and works to make great terrain or figure conversions.
Monday, July 13, 2009
Terrain: Metal, Plastic, and Resin. Mostly Resin.
So when it comes to Resin, Plastic and Metal terrain... don't try making it at home.
Cutting, Welding, Molding, etc with metal is a dangerous procedure you need expensive proper equipment & training for. If you're not a professional don't even think about it. If you are a professional you don't need tips from my blog.
Plastic is less dangerous but a whole lot more difficult & expensive.
Resin is also expensive, but I can see some reasonable exceptions. Hirst Arts makes some rubber molds that are good for use with resin making kits. These are small parts that could also just be made with Plaster. Resin doesn't break as easily as plaster does when it is thinned out because it is more flexible. If you start casting plaster you can learn a little bit about it, but in general leave Resin casting to the professionals.
The Miniature Building Authority makes pre-painted Resin buildings that can be played with immediately. I've only recently found their store and haven't seen any of their product yet in person. Armorcast makes a variety of materials from Resin and Metal and I can strongly recommend their products that I've tried so far.
As you can see in the video though their resin and metal products almost always come unpainted. This is a plus or a minus depending on how you want to see it. A lot of quick parts like you might buy at a toy store are very poorly painted and you can do just as well even if you're half-blind painting your own. You also have the opportunity to paint them the way you want them to look.
So what would you do with them if you were to buy one from a place like Armorcast? Well you'd want to paint it so it isn't one solid color without detail.
(Optional Step) If you're going to paint it in high detail I recommend you clean it first. Small impurities and oils are attracted to resin and can easily be cleaned off with a little dish soap and an old toothbrush to get into those nooks and crannies. Let it dry for 24 hours. Now this is the critical part is to not handle it with your bare hands as you'll get those oils you just cleaned off back onto it. Handle it with plastic gloves and prime it and don't touch it with bare hands until you have a coat of paint on it. Skin oils will stick to a good paint primer as well so remember to only handle parts that have a coat of paint on it. For an ever better practice try not handle it at all until it has its finishing coat on it.
As a general rule of thumb I don't use my high pigment paints for miniatures on my terrain pieces. It is simply a waste of expensive paint for something that doesn't show the detail. If you're working on a large terrain piece with moderate detail then use some cheap craft store paints. My preferred brands for terrain are Americana and Folk Art because they have a good pigment count for the cost. When I'm doing high detail on exquisite terrain pieces like Armorcast I'll go ahead and hit it with my minis paints to make those fine details really noticable and crisp.
This is a good video showing of a painted Armorcast trench set.
Some of you are very daunted by anything that needs painting because you don't feel you can paint. But I've seen people legally blind who can paint well with a couple simple techniques. Any kid can learn how to put paint on a brush and stroke it across a surface. The only two techniques you need to make that look awesome are wet brushing and dry brushing. Wet brushing is simply using a clean, but extra wet brush with your paint to allow it run to or pool in recesses naturally. You can use a dry brush or carefully use a corner of paper towel to clean up excess moisture. Getting some good practice at just those two techniques is enough to make any painting project look awesome.
Same as with your miniatures resin (Not Foam!) painted Terrain is best protected with a finishing coat of Matte or Gloss. These can be sprayed or brushed on depending on your preference. If you're not a fan of a lot Object Source Lighting (OSL) or Non-Metal Metal (NMM) then you'll want to use a low glow Matte or High Gloss to get the proper amount of shine and reflectance on your terrain. High Gloss really gives crystal and some metals that proper gleam they should have. Just bear in mind that gloss does not photograph well at all. So the more gloss it has will make it photograph worse even if it looks that much more awesome on your tabletop. So do you want it to look better in photos or on the playing table?
Below is Armorcast's showcase of painted terrain pieces which may hopefully help to inspire you.
Cutting, Welding, Molding, etc with metal is a dangerous procedure you need expensive proper equipment & training for. If you're not a professional don't even think about it. If you are a professional you don't need tips from my blog.
Plastic is less dangerous but a whole lot more difficult & expensive.
Resin is also expensive, but I can see some reasonable exceptions. Hirst Arts makes some rubber molds that are good for use with resin making kits. These are small parts that could also just be made with Plaster. Resin doesn't break as easily as plaster does when it is thinned out because it is more flexible. If you start casting plaster you can learn a little bit about it, but in general leave Resin casting to the professionals.
The Miniature Building Authority makes pre-painted Resin buildings that can be played with immediately. I've only recently found their store and haven't seen any of their product yet in person. Armorcast makes a variety of materials from Resin and Metal and I can strongly recommend their products that I've tried so far.
As you can see in the video though their resin and metal products almost always come unpainted. This is a plus or a minus depending on how you want to see it. A lot of quick parts like you might buy at a toy store are very poorly painted and you can do just as well even if you're half-blind painting your own. You also have the opportunity to paint them the way you want them to look.
So what would you do with them if you were to buy one from a place like Armorcast? Well you'd want to paint it so it isn't one solid color without detail.
(Optional Step) If you're going to paint it in high detail I recommend you clean it first. Small impurities and oils are attracted to resin and can easily be cleaned off with a little dish soap and an old toothbrush to get into those nooks and crannies. Let it dry for 24 hours. Now this is the critical part is to not handle it with your bare hands as you'll get those oils you just cleaned off back onto it. Handle it with plastic gloves and prime it and don't touch it with bare hands until you have a coat of paint on it. Skin oils will stick to a good paint primer as well so remember to only handle parts that have a coat of paint on it. For an ever better practice try not handle it at all until it has its finishing coat on it.
As a general rule of thumb I don't use my high pigment paints for miniatures on my terrain pieces. It is simply a waste of expensive paint for something that doesn't show the detail. If you're working on a large terrain piece with moderate detail then use some cheap craft store paints. My preferred brands for terrain are Americana and Folk Art because they have a good pigment count for the cost. When I'm doing high detail on exquisite terrain pieces like Armorcast I'll go ahead and hit it with my minis paints to make those fine details really noticable and crisp.
This is a good video showing of a painted Armorcast trench set.
Some of you are very daunted by anything that needs painting because you don't feel you can paint. But I've seen people legally blind who can paint well with a couple simple techniques. Any kid can learn how to put paint on a brush and stroke it across a surface. The only two techniques you need to make that look awesome are wet brushing and dry brushing. Wet brushing is simply using a clean, but extra wet brush with your paint to allow it run to or pool in recesses naturally. You can use a dry brush or carefully use a corner of paper towel to clean up excess moisture. Getting some good practice at just those two techniques is enough to make any painting project look awesome.
Same as with your miniatures resin (Not Foam!) painted Terrain is best protected with a finishing coat of Matte or Gloss. These can be sprayed or brushed on depending on your preference. If you're not a fan of a lot Object Source Lighting (OSL) or Non-Metal Metal (NMM) then you'll want to use a low glow Matte or High Gloss to get the proper amount of shine and reflectance on your terrain. High Gloss really gives crystal and some metals that proper gleam they should have. Just bear in mind that gloss does not photograph well at all. So the more gloss it has will make it photograph worse even if it looks that much more awesome on your tabletop. So do you want it to look better in photos or on the playing table?
Below is Armorcast's showcase of painted terrain pieces which may hopefully help to inspire you.
Terrain basics
So you want to use something that fits the scene for tabletop games than books and random objects found around the house? Then it is time for some appropriately scaled terrain. Whether you're making it or buying it, how is the terrain made?
Well the very first question is: What is it made from?
This is what you will typically find it made from:
- Resin, Plastic and Metal (Advanced, don't think of making these at home)
- Wood (Good for basing large terrain pieces, I stay away from carving or woodburning)
- Foam (Gets good detail and cheap, but has its downsides)
- Plaster (Very customizable in detail, very modular and sturdy. Also has its downsides)
- Sculpting Materials (Lots of materials, various ups and downs to them)
- Any random stuff you find (Thisis a very essential skill to enhance anything you work on)
Enjoy and Game-On!
Subscribe to:
Posts (Atom)